|
Sometimes forms aren't used at all - the mix is just augured, pumped or sprayed on some type of framework or mesh - often onto offset layers of chicken wire.
Some people have tried monolithic pours of papercrete into forms of full wall height - like pouring a concrete basement wall. Pouring papercrete this way can be challenging. Thick layers result in a great deal of compression at the bottom of the form. This can result in uneven density - much more at the bottom than at the top. When the water runs out of mix poured so deep, there is a great deal of shrinkage - up to thirty percent in height. Because the forms stay in place until the entire height of the wall has been poured, most of the surface of the papercrete mix is cut off from the outside air. This can cause the wall to dry very slowly and unevenly, resulting in pockets, creases and voids. All of these issues can be addressed, but slip forming might be a better approach.
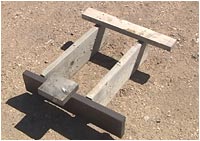 |
| Mike McCain’s Magic Box slip form. |
When using slip forms, large, expensive, floor to ceiling forms do not have to be built. Slip forms are long, light movable forms, which are placed on the wall temporarily and are moved as soon as the layer they form is set. These forms are usually only six to eight inches in height so the problems with thick layers are avoided. They can be built of wood or lightweight Purlin steel very inexpensively. Slip forms can be as short as Mike McCain's Magic Box or as long as practical.
Mike McCain builds simple slip forms in ten-foot lengths, which can be connected to make corners and to accommodate just about any volume of pour. Slip forms are removed when the mix is set, but before it is completely dry, in order to easily extract retaining rods, which protrude through the wall to hold the bottom of the forms in place.
 |
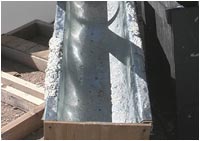
| Slip forms made of Purlin steel and pieces of notched “L” iron. |
Slip forms are great. You can use them to pour relatively thin layers around the perimeter of the building, allowing the layers you've poured to dry while moving to an adjacent area of the wall. The whole block-making procedure is avoided.
But slip forms can only be used when you have ready access to substantial amounts of water - or own a large tank. And slip forming has to be done at the construction site.
Since my construction site will be three hours away from where I currently live, I will have to make blocks in my back yard and then transport them to the site. This is another advantage of papercrete. Because it is so light, a good number of blocks can be transported with a utility trailer - about the number I can make in my spare time during the week.
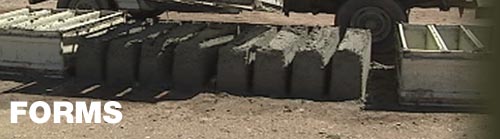
My first set of forms was made of wooden 2" x 6"s ( 5 x 15 centimeters). I managed to find some straight eight-footers (240 centimeters) at the lumberyard after going through several piles. Here's my first piece of advice. Don't buy green lumber for forms. As the lumber dries, it will twist and warp. I almost bought green Douglas Fir. That would have been a nightmare. I ended up getting kiln dried 2" x 6" x 8's, which were pretty easy to work with. The form design came from a master practitioner in papercrete, Lex Terry. Each form makes five blocks 24 inches (61 centimeters) long by 12.5 inches (31 centimeters) wide by five inches (13 centimeters) thick. In addition to producing a good working size block, the forms are limited enough in height to allow a pickup truck and the towed mixer to pass over them. That means the mixer can be parked directly above the forms and emptied into them without having to move the wet mix by hand or other means.
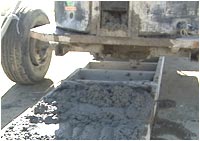 |
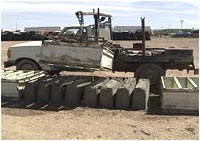
| Tow mixer positioned over forms for pour. |
I had to build six forms to hold one 200-gallon (900 liter) mixer load of papercrete. It turns out that each form required exactly three - 2" x 6" x 8's - no waste. When I built the last form, I divided two of the five compartments in half with an additional piece of 2 x 6 to make half blocks. Cutting papercrete is a dusty business so I thought I would make a few half blocks per pour to cut down on the cutting later. I made the blocks a foot wide because all the single-story papercrete structures I've seen have walls one foot (30 centimeters) thick. Two story structures may require a wider block. Further testing will tell the story.
When I got the lumber home, I waterproofed it before cutting it to size. The idea was to get the waterproofing into the joints where it would be needed most. This could only be done before assembling the forms. This was a good idea, but with unintended consequences. Putting on a liberal coat of waterproofing made the lumber very slick. It slid all over the place during assembly. I considered it necessary to penetrate the joints with waterproofing, but having the waterproof coating also made it harder to apply the Elmer's glue. It tended to sheet right off. So I'm not sure that applying the waterproofing before assembly was worth it. I do know that using 4 1/2 inch (10 centimeter) deck screws was worth it. I put three screws in each joint. I predrilled pilot holes for each screw with one drill and used a second drill to drive in the screws. All in all, it was pretty grueling work - 216 screws for all six forms - but these forms will not come apart - ever. I decided to put a lot of time into the forms because I will have to live with them for quite a while and didn't want to be fixing them all the time. I also realized that after they were done serving as forms, they could be slightly modified for use as scaffolding, shelves, work tables, etc. so I didn't spare any energy or cost in their construction.
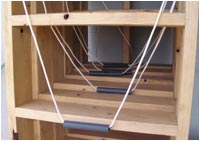 |
| Sliding PVC handles on the lifting ropes make it easier on the hands when removing the forms. |
One other back-saving feature that came from Lex Terry is the rope loops with PVC handles.
Connected to each end of the form, this makes it very easy for one person to lift the form off the blocks after the mix has set.
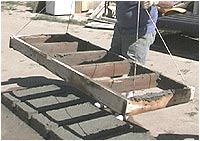 |
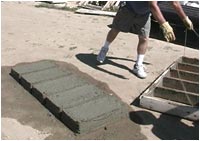
| Lifting off the forms after the mix is set. |
Then the form is moved to the next location and filled again. One man, working continuously, can produce about 150 blocks per eight-hour day using this approach. It takes about two thousand blocks to build a 1600 square foot (roughly 165 square meter) home including at least one major interior dividing wall.
 |
| Forms made of recycled store shelves being winched off set blocks. |
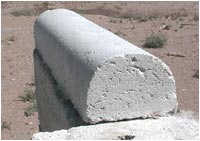
Mike McCain uses recycled metal grocery store shelving for forms. He has modified a 4-wheel drive vehicle to mix 1000 gallons (4500 liters) of slurry at a time. When the mix is ready, he moves the mixer next to the forms and lets the mix pour out as he drives slowly past the forms. When the mix is set, he uses a second vehicle, equipped with a homemade boom and electric winch to lift the metal forms off the blocks. While the forms are still in the air, he moves them down the line to place them at the next location for filling. Mike can repeat the entire process about once every thirty to forty-five minutes. His blocks are small logs 12 inches (30 centimeters) by 12 inches by three feet (about a meter) after trimming.
Mike runs his rough blocks through a trimmer to make them smooth and of consistent dimensions. Perception plays a big part here. People tend to like papercrete when it's smooth and regular and dislike exactly the same material when it's comparatively rough. See
Perceptions. Clyde T. Curry uses molds made of plastic material and casts his blocks vertically to save mold field space. His molds are lightweight and take up very little space.
|